Thursday, 20 October 2011

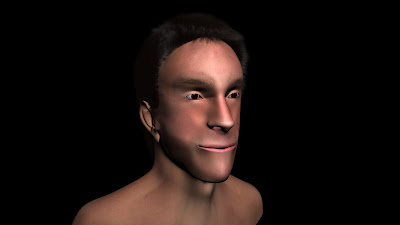
Completed Head


I am pleased with how my model has turned out. It has been a very time consuming project involving lots of trial and error (with regard to the hair & fur modifier especially). The most complex part was the UVW unwrap stage, this took a very long time as it was the first time I had used this feature and didn't really understand it until I had finished using it.

I haven't full got to grips with the hair modifier and had to start over several times before I manage to resemble something that looked something like hair. I couldn't get the curls to look right so opted for straight brushed hair in the end. Using it around the eyelashes gave a more realistic look and I would have liked to make the eyebrows with the modifier but unfortunately due to time constraints had to leave them out.

In conclusion I have learned a lot from this module and strengthened my modelling techniques. I have come to realise that organic modelling is so much harder to get right than inorganic modelling. I have also learned new tools and techniques in Photoshop including differnt filters and adjustments that can be made to photographs.

Making the eyes

To make the eyeball a capsule primitive was made and converted into an editable polygon. The inner polygons were removed then the two semi circles were wielded together. A capsule was used because when a turbo smooth is applied to a sphere there are often issues with deformation around the outer polygon rings.


The capsule was cloned and scale up slightly to form the clear outer membrane of the eye. The second ring of edges was selected and a small chamfer was applied. This allowed the front polygons to be selected and pulled forward to create the lens of the eye.


The smaller capsule was cloned and all but the second ring of polygons from the front were deleted. This was then labelled iris.


To make the black of the pupil the smaller capsule was selected and the central vertex at the front was pulled back to make a cone shape. this was then detached from the capsule, so that a black colour could be applied to it.


A turbo smooth of 3 iterations was applied to each part of the eye.


The pupil of the eye (cone) had a black colour applied to it. The outer skin (lens) had an architect and design material of clear thin geometry glass applied to it to give a clear shiny lens. A photo of an eye was taken and edited in Photoshop so that only the iris was visible. Using a UVW Mapping modifier the bitmap was scaled and moved to fit the iris.

This is a completed render of the eye


To make the caruncle the head was cloned and all the polygons were removed apart from edges around the corners of the eye.


The edges were then copied and cloned back into the eye and scaled towards the centre of the eye.


Eyelashes

To make the eyelashes A clone of the head was made and all the uvw modifiers were deleted from it (everything else in the scene was hidden). All the polygons apart from the ones around the eyes were deleted. This gave a base to grow the eyelashes from. A hair and fur modifier was applied to the polygons. The hair brush tool was used to style hair in the right direction. The cut tool was used to trim the lashes.


Each hair was positioned to replicate how the lashes are formed.


The colour was set to a dark brown and the specular level was set to 12 as the lashes dont have much of a shine to them.


The amount of hair was set to 500 and the hair segments to 5 and the hair passes set to 3. Values of 3 were set for the tip thickness and 7 for the root. The frizz parameters were adjusted until they looked natural and a value of 47 looked best.


Wednesday, 19 October 2011

Using the hair and fur modifier


To get the hair to look more realistic the hair and fur modifier was used instead of the reference image.
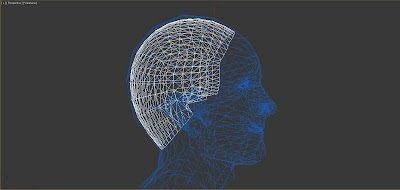
The first step was to clone the head and delete all the polygons except the ones that the hair was going to grow from.


A turbo smooth was applied as well as a symmetry modifier. This gave a surface which the hair and fur modifire could be attached.


The hair and fur modifier was applied to the surface and using the style hair tool it was brushed to the desired style.


Making sure the "ignore back facing" wasn't selected the hair was brushed form the front and right orthographic views.


By toggling around the viewport it was possible to see which parts of the hair needed brushing.

The original Photoshop file containing the skin had to be modified to remove the image of the hair on the forehead and around the sideburns; this was done with the clone tool and the patch tool.


After the hair had been brushed correctly the cut tool was used to trim the hair around the ear. The hair count was raised to 50000 and the hair segments and hair passes set to 5. The thickness of the roots was adjusted until the hair looked right.

The tip colour and root colour were set to dark brown. To get a shine on the hair the specular tint was set to white and a level of 22. The glossiness was set to 95.


The hair still need some tweaking but its nearly there.


The twist brush was used to try and replicate the way the hair grows from different direction on the back of the scalp.


Creating a Specular Map with existing bump map

To get the correct light point on the face a specular map had to be added. Using the existing bump map the image levels were adjusted until the background was black, but making sure the whites were visible.


In a new layer the brush tool was used and set to lighten with the opacity to 20%. The lighter parts could then be drawn onto the face. The Gaussian blur feature was used to soften the edges of the brush and make it more subtle. The file was then saved as Specular Map.


In 3ds Max a specular map was added to the skin material and the specular map file was loaded as a bitmap. The image was then rendered and adjustments were made to the Photoshop file to get the desired amount of shine on the face. The level amount was set to to 50, which gave a subtle shine across the face.


Setting up the bump map

A copy of the uvw map material was made and in Photoshop


Under the image tab, adjustments was selected and the levels were adjusted so that the black and the white markers were at the start of the each part of the graph.


Under the filter tab highpass was selected and the pixels radius was set to 3. This would define the bump map in 3ds Max.


The image was loaded into the bump map and the amount was set to 15. Some of the outline of the face was present in the map, so theses were edited in Photoshop using the clone tool.


The Bump map didn't look very realistic so a mix filter was added to the bump. In the bump filter the bitmap was selected and mix was selected, then keep old bitmap as sub map was pressed.

The colour #2 was selected and add noise was pressed. It was set to fractal and the size was set to 0.01.

The mix was then set to 100 so that only the noise map could be shown. The face was then rendered to compare the difference. The bump texture was too large so the x and y tiling were set to 4.


The mix amount was adjusted until the texture looked as accurate as possible to the skin texture. The final mix was 60.


Final render of the head with Bump texture set


Thursday, 13 October 2011

Face with ears and adjusted UVW map

After lots of tweaking and use of the patch tool the face material is nearly complete.